
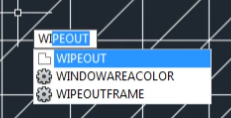
1. Using the WIPEOUT Command
-
- Select the object you want to remove the Autodesk writing from.
-
- Type the WIPEOUT command on the command line.
-
- Press enter.
-
- The WIPEOUT command will ask you to select which objects you want to remove the Autodesk writing from. Select the object and press enter.
2. Using the DRAWORDER Command
The DRAWORDER command is another way to get rid of Autodesk writing in Autocad. This command will arrange the order of the images on the layer so that the Autodesk writing on that layer will be covered by other images on it. How to use the DRAWORDER command is as follows:-
- Select the object you want to set the order of the images on its layer.
-
- Type the DRAWORDER command on the command line.
-
- Press enter.
-
- The DRAWORDER command will display a list of layers in the image. Select the layer containing the words Autodesk and drag it down then press enter.
-
- Objects that have arranged the order of the images on their layer will be covered by other images and the Autodesk text will no longer be visible.
3. Using the EXPORT Command
The EXPORT command is another way that can be used to remove Autodesk writing in Autocad. This command will generate a new image in a different format without the Autodesk writing contained in the previous image. How to use the EXPORT command is as follows:-
- Select the object that you want to export to a different format.
-
- Type the EXPORT command on the command line.
-
- Press enter.
-
- Select the desired export format, such as JPEG or PNG.
-
- After that, the Autodesk inscription contained in the previous image will no longer be visible in the new image.
4. Using the XREFOVERRIDE Command
The XREFOVERRIDE command is another way that can be used to get rid of Autodesk writing in Autocad. This command will override the default layer settings contained in the reference file so you can change the appearance of the reference layer. How to use the XREFOVERRIDE command is as follows:-
- Select the object on the layer that you want to change its appearance.
-
- Type the XREFOVERRIDE command on the command line.
-
- Click on the object you want to change on the layer contained in the reference file.
-
- Select the “Yes” option on the confirmation message.
5. Using the PURGE Command
The PURGE command in Autocad can be used to clean files from unused objects so that it can speed up application performance and reduce file size. Apart from that, this command can also help you get rid of the words Produced by Autodesk in Autocad. Here are the steps using the PURGE command:-
- Type the PURGE command on the command line.
-
- Select the “Regapps” and “All” options to clean up unused objects.
-
- Click the “Purge All” button.
6. Using the -DWGUNITS Command
The -DWGUNITS command can be used to change unit settings in Autocad files. One of the unit settings in Autocad is “Insertion Scale”. If these settings do not meet your needs, Autodesk’s writing on Autocad may appear. Here are the steps using the -DWGUNITS command:-
- Type the command -DWGUNITS on the command line.
-
- Select the “Inches” or “Millimeters” option as needed.
-
- Click the “OK” button.
Conclusion
Removing Autodesk writing in Autocad can indeed be done in several ways, such as using the WIPEOUT, DRAWORDER, EXPORT, XREFOVERRIDE, PURGE, and -DWGUNITS commands. However, you should always be careful when making changes to your Autocad files because they can impact the performance and safety of the files. Also, make sure that you have permission from the owner of the Autocad file before making changes. Hopefully this article is useful for those of you who are having problems with Autodesk writing on Autocad.Writer and proudly owner of Diringkas.com!
I like to Staying up-to-date with the latest tech advancements, playing video games, discovering new games, and writing about them.